Motivation
Whiteboard is a powerful tool for us to express ideas and further could be developed to collaborate or even draw on a video stream. Whiteboard is an interesting feature to add to most web applications and is more interesting when you add it to live video applications. Webinars, conference apps, and even for fun. In this article, I have described how to implement a very basic application from the canvas API. This can be developed for many other applications like drawing something on a video stream, furthermore for an object detection application.
What is canvas API
As the foundation to our whiteboard, we will use the HTML Canvas.
"The Canvas API provides a means for drawing graphics via JavaScript and the HTML <canvas> element. Among other things, it can be used for animation, game graphics, data visualization, photo manipulation, and real-time video processing.The Canvas API largely focuses on 2D graphics. The WebGL API, which also uses the <canvas> element, draws hardware-accelerated 2D and 3D graphics."This is what the official documentation says. You can find more about this from the below link.


So in simple, we can use this to draw graphics on our browser. The canvas element itself gives some event listeners where developers can integrate them to make amazing applications. For this particular example, I will be showing the usage of three such event listeners. They are,
- onMouseDown: We use this to catch the event of pressing the mouse
- onMouseUp: We use this to catch when the mouse press is released.
- onMouseMove: We are going to catch whether the mouse is moving or not. So if it is moving we just have to match those coordinates through a line so that we can see a drawing.
Let's build the App
Step 1: Create an empty react project.
npx create-react-app simple-whiteboardStep 2: Clean everything inside App.js and let's start building from scratch.
Step 3: Inside the return component insert a canvas element and add the event listeners.
return (
    <div>
      <canvas
        onMouseDown={onMouseDown}
        onMouseUp={onMouseUp}
        onMouseMove={draw}
        ref={canvasRef}
      />
    </div>
  );
Step 4: Let's declare the canvasRef variable to keep track in canvas. This will help us to do the rest of the magic.
const canvasRef = useRef();Step 5: Initiate the canvas once the component is mounted. We can set the width and height of the canvas here. We also going to define the context where the graphic is going to be drawn. The lineCap, strokeStyle, and lineWidth parameters set the basic styles to the context.
  useEffect(() => {
    const canvas = canvasRef.current;
    canvas.width = window.innerWidth * 2;
    canvas.height = window.innerHeight * 2;
    canvas.style.width = `${window.innerWidth}px`;
    canvas.style.height = `${window.innerHeight}px`;

    const context = canvas.getContext('2d');
    context.scale(2, 2);
    context.lineCap = 'round';
    context.strokeStyle = 'black';
    context.lineWidth = 5;
    contextRef.current = context;
  }, []);
Step 6: Let's define the onMouseDown function. This will get an event that contains the coordinates where the mouse pointer is placed. We are going to call the beginPath() method to let the context know to start drawing. We also going to keep a variable to track the mouse pressed and released status, which we will use to let the context know when to draw and when to not.
const [isDrawing, setIsDrawing] = useState(false); const onMouseDown = ({ nativeEvent }) => {
const { offsetX, offsetY } = nativeEvent;
contextRef.current.beginPath();
contextRef.current.moveTo(offsetX, offsetY);
setIsDrawing(true);
};Step 7: onMouseUp function will close the path that we started at onMousePressed. This also will toggle the drawing status to false.
const onMouseUp = () => {
contextRef.current.closePath();
setIsDrawing(false);
};Step 8: The Draw function will take in an event that has the coordinates of the current mouse position and it will join the last mouse position with the current making a graphic like we drew a line on the browser.
const draw = ({ nativeEvent }) => {
if (!isDrawing) {
return;
}
const { offsetX, offsetY } = nativeEvent;
contextRef.current.lineTo(offsetX, offsetY);
contextRef.current.stroke();
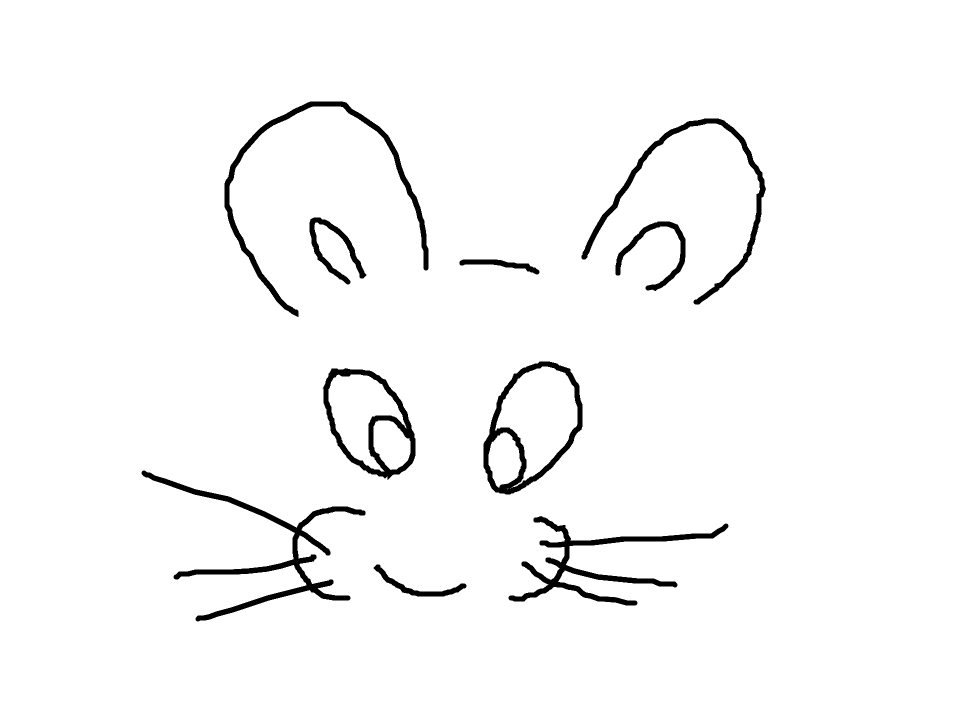
};Now at the event, you will get a white color empty page where you can see a drawing when you try to press and drag on it. Here is the final code if you followed steps 1 by 1.
import React, { useState, useRef, useEffect } from 'react';
function App() {
const canvasRef = useRef();
const contextRef = useRef();
const [isDrawing, setIsDrawing] = useState(false);
useEffect(() => {
const canvas = canvasRef.current;
canvas.width = window.innerWidth * 2;
canvas.height = window.innerHeight * 2;
canvas.style.width = `${window.innerWidth}px`;
canvas.style.height = `${window.innerHeight}px`;
const context = canvas.getContext('2d');
context.scale(2, 2);
context.lineCap = 'round';
context.strokeStyle = 'black';
context.lineWidth = 5;
contextRef.current = context;
}, []);
 const onMouseDown = ({ nativeEvent }) => {
    const { offsetX, offsetY } = nativeEvent;
    contextRef.current.beginPath();
    contextRef.current.moveTo(offsetX, offsetY);
    setIsDrawing(true);
 };
const onMouseUp = () => {
    contextRef.current.closePath();
    setIsDrawing(false);
};
const draw = ({ nativeEvent }) => {
    if (!isDrawing) {
    	return;
    }
    const { offsetX, offsetY } = nativeEvent;
    contextRef.current.lineTo(offsetX, offsetY);
    contextRef.current.stroke();
};
return (
<div>
<canvas
onMouseDown={onMouseDown}
onMouseUp={onMouseUp}
onMouseMove={draw}
ref={canvasRef}
/>
</div>
);
}
export default App;
Enjoy...