
Agora React Web UIKit
Agora is one of the leading video, voice and live interactive streaming platform, helping developers deliver rich in-app experiences—including embedded voice and video chat, real-time recording, interactive live streaming, and real-time messaging.


Being one of the most adopted video conferencing solutions, Agora provides specific libraries to easily integrate an Agora implementation into an application.
- agora-web-sdk - The Javascript implementation of the Agora browser interface. This makes use of browser APIs to control the features of a live conference.
- agora-web-sdk-ng - The next generation implementation of Agora Web Kit which is Typescript based. This is slightly different from the agora-web-sdk but can be easily migrated following some simple steps.
- agora-rtc-sdk - Agora RTC (Real-time Communication) SDK for enabling real-time audio and video communications.
- agora-rtm-sdk - The Agora RTM (Real-time Messaging) SDK provides global messaging cloud service with high reliability, low latency, and high concurrency.
- agora-rtc-react - A React wrapper for the agora-rtc-sdk.
- agora-rtm-react - A React wrapper for the agora-rtm-sdk.
- agora-react-uikit - A library that instantly integrate Agora video calling or streaming into your web application using a React based VideoUIKit.
- agora-rn-uikit - UIKit for React Native.
Agora React Web UIKit allows developers to integrate a video calling application in quick time. This article will discuss what we can do using the UIKit. We will use the agora-react-uikit to explain how to create a custom Video calling application.

To begin everything with, we need to have an Agora account and an Agora application created within the Agora console.
Creating an Agora Application
Agora console is the central place for everything related to Agora applications. You can visit https://console.agora.io and create a new account or sign in for an existing one.
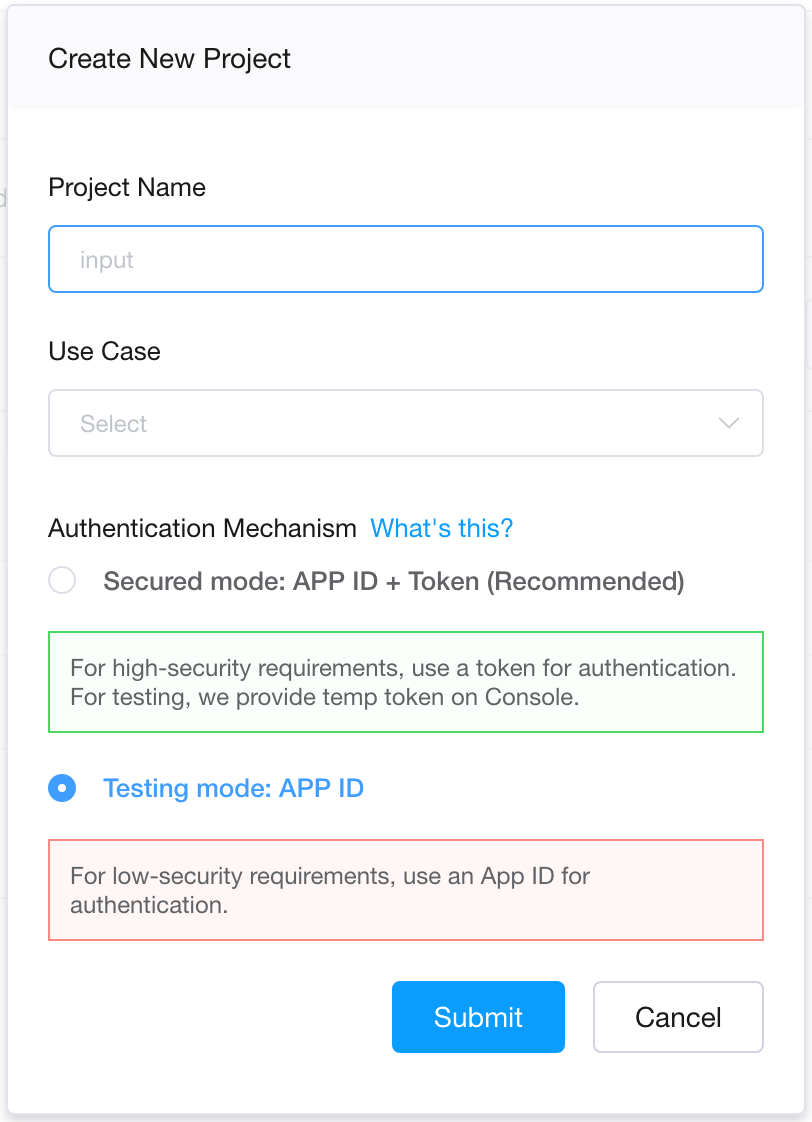
Creating a new application will create a new App ID as well. This App ID is used to connect with the Agora servers.
More things that you can do in the Agora console.
- Create and configure Agora applications.
- Change application certificates.
- Manage Agora extensions.
- Check Agora application statistics.
- Manage billing and payments.
Agora React UIKit Example
Agora React UIKit can be integrated using a very small code template.
import React, { useState } from 'react';
import AgoraUIKit from 'agora-react-uikit';

const AgoraUI = () => {
    const [videoCall, setVideoCall] = useState(true);

    const rtcProps = {
        appId: '<Agora App ID>',
        channel: '<Channel Name>',
        token: '<Channel Token>'
    };

    const callbacks = {
        EndCall: () => setVideoCall(false),
    };

    const rtmProps = {};

    const styleProps = {};

    return videoCall ? (
        <div style={{ display: 'flex', width: '100vw', height: '100vh' }}>
            <AgoraUIKit rtcProps={rtcProps} callbacks={callbacks} rtmProps={rtmProps} styleProps={styleProps} />
        </div>
    ) : (
        <h3 onClick={() => setVideoCall(true)}>Start Call</h3>
    );
};

export default AgoraUI;
We need to add our Agora App ID, Channel name and the Token into the application configuration. These can be found/created from within the Agora console.
Note: For those who are using Next.js, the agora-react-uikit library should be imported as a dynamic import. This is because of the server side rendering nature of the Next.js framework.const AgoraUIKit = dynamic(() => import('agora-react-uikit'), {
ssr: false
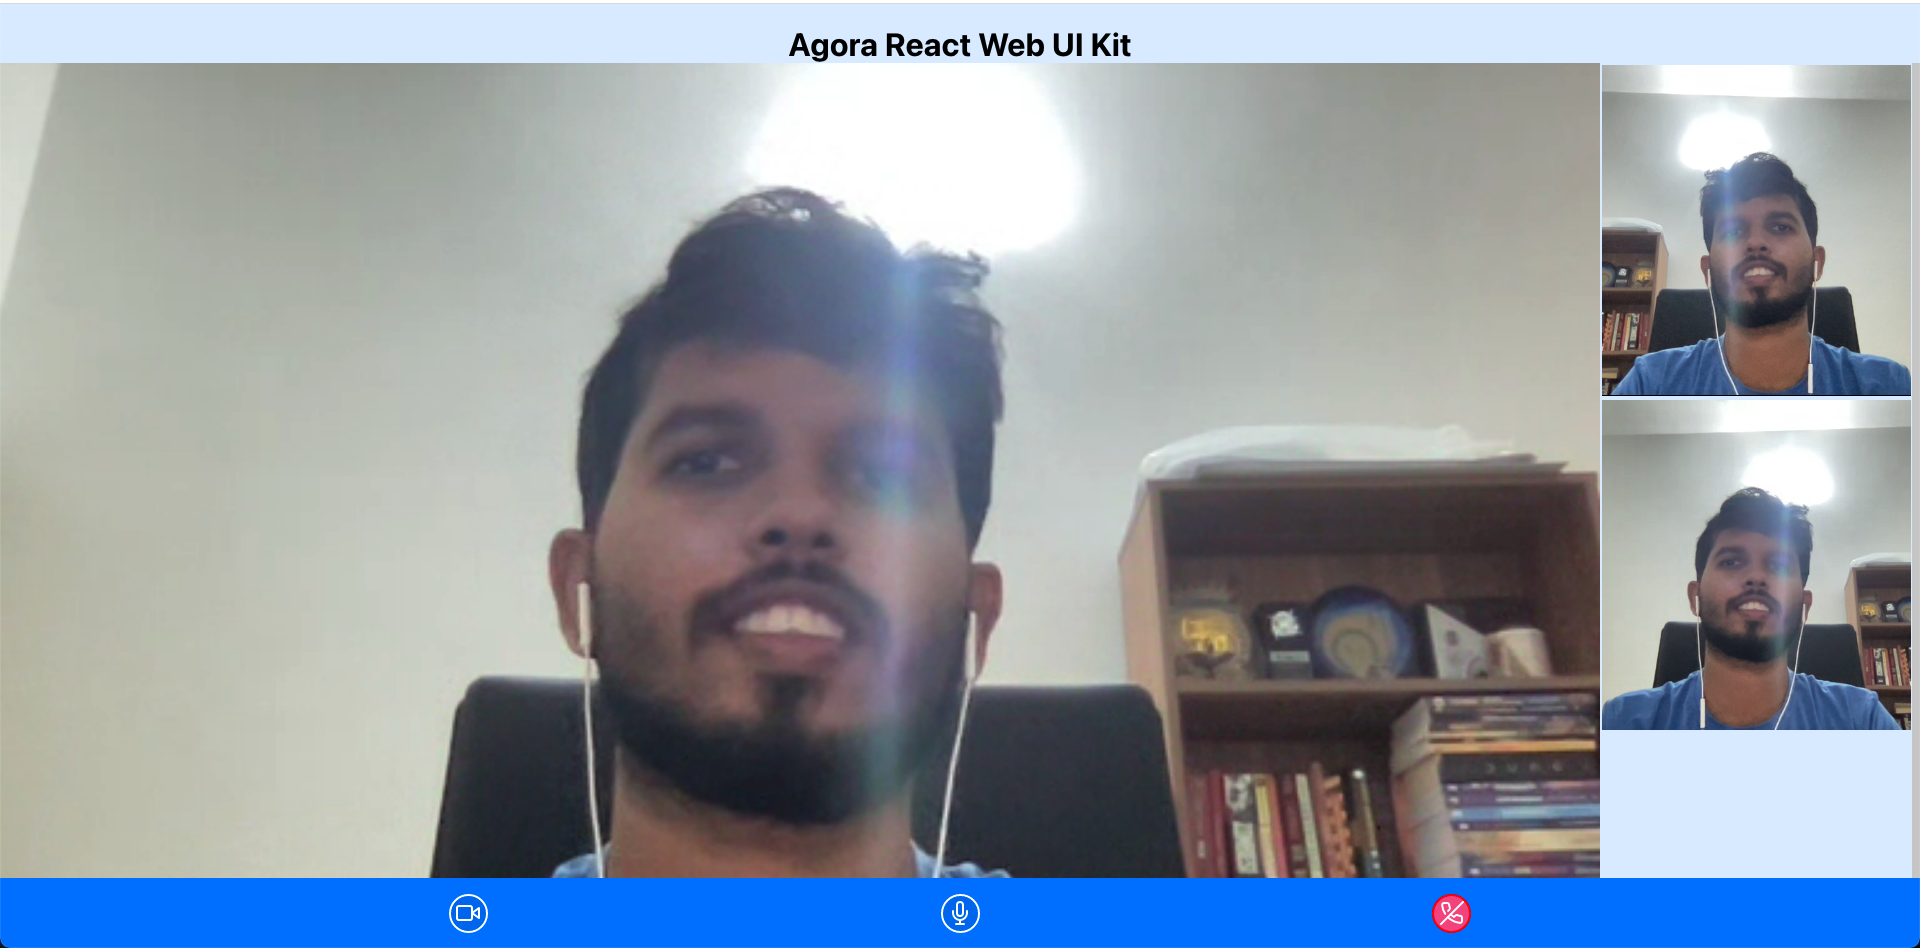
});With this small code the library will establish a video conference and render a UI just like this. You can see why it is very simple to initiate a meeting with the Agora React UIKit considering how little code we need.
We can further modify the style properties and customise the appearance of the video conference. Let's add some simple styles onto action buttons and the muted user tile.

Check out more styling options with the StylePropInterface in the UIKit documentation.
Extending the UI
We know that some high-end video conferences like Google Meet, Zoom, Jitsi provide more flexible, appealing, responsive views to the end user. In case you find the default layout not so appealing, Agora React UIKit provides us some UI components that can be used to do the same. We can extend them and create our own layout.
Assume that we need to use the main speaker's video in a larger container and the other speaker's videos as smaller tiles. We can use the <MaxVideo /> and <MinVideo /> components from Agora UIKit for that requirement.
import { MaxUidContext, MaxVideoView, MinUidContext, RtcContext, MinVideoView, GridVideo } from "agora-react-uikit";
import { useContext } from "react";
import { useSelector } from "react-redux";
import { MEETING_LAYOUT } from "../../../meet/constants";
import { selectMeetingLayout } from "../../../meet/selectors";

const AgoraUIVideos = (props: Props) => {
    const maxUsers = useContext(MaxUidContext)
    const minUsers = useContext(MinUidContext)

    const users = [...maxUsers, ...minUsers]

    const { client, localVideoTrack } = useContext(RtcContext);
    const meetingLayout = useSelector(selectMeetingLayout);

    return (
        <div>
            {meetingLayout === MEETING_LAYOUT.GRID_VIEW ?
                <div className={styles.gridVideoContainer}>
                    <GridVideo />
                </div>
                :
                <>
                    <div className={styles.maxVideoContainer}>

                        {maxUsers.map((user) => {
                            return (
                                <div className={styles.maxVideo} key={user.uid}>
                                    <MaxVideoView user={user} style={{
                                        height: '100%',
                                        borderRadius: '10px'
                                    }} />

                                </div>
                            )
                        })}

                    </div>

                    {minUsers.length !== 0 ? (
                        <div className={styles.minVideoContainer}>

                            {minUsers.map((user) => {
                                return (
                                    <div className={styles.minVideo} key={user.uid}>
                                        <MinVideoView user={user} key={user.uid} />

                                    </div>
                                )
                            })}

                        </div>
                    ) : null}
                </>
            }
        </div>
    )
}
Above code will render the <GridVideo /> component in the UIKit or a custom view to show the users in the meeting. The layout will highlight the currently active user in a larger container and the other users into a filmstrip. For that it will make use of the <MinVideoView /> and the <MaxVideoView /> in Agora React UIKit.
Extending Internal Functions
You can even extend library behaviours in the Agora React UIKit. The following code will show how to extend a class inside the library to generate a custom behaviour. Have a look at on how to specify the device ID to select which camera device needs to be used to create the initial video track.
import { TracksContext } from "agora-react-uikit";
import React, { useEffect, useRef, useState } from "react";
import AgoraRTC, { createClient, AgoraVideoPlayer, createMicrophoneAndCameraTracks } from 'agora-rtc-react';
import { useSelector } from "react-redux";
import { selectVideoInputDeviceId } from "../../../permissions/selectors";

interface Props {
    children: any
}

const useAgoraTracks = () => {
    const [ready, setReady] = useState(false);
    const [tracks, setTracks] = useState<any>(null);
    const [error, setError] = useState<any>(null);

    const videoInputDeviceId = useSelector(selectVideoInputDeviceId);

    useEffect(() => {
        const createTracks = async () => {
            try {
                const tracks = await AgoraRTC.createMicrophoneAndCameraTracks({
                    encoderConfig: {}
                }, {
                    encoderConfig: {},
                    cameraId: videoInputDeviceId
                });

                setTracks(tracks);
                setReady(true);
            } catch (error) {
                setError(error);
            }
        }

        createTracks();
    }, [videoInputDeviceId]);

    return {
        ready,
        tracks,
        error
    };
};

const AgoraTracksConfigure = function TracksConfigure(props: Props) {
    var _useState = useState(false),
        ready = _useState[0],
        setReady = _useState[1];

    var _useState2 = useState(null),
        localVideoTrack = _useState2[0],
        setLocalVideoTrack = _useState2[1];

    var _useState3 = useState(null),
        localAudioTrack = _useState3[0],
        setLocalAudioTrack = _useState3[1];

    var _useTracks = useAgoraTracks(),
        trackReady = _useTracks.ready,
        tracks = _useTracks.tracks,
        error = _useTracks.error;

    var mediaStore = useRef({});
    useEffect(function () {
        if (tracks) {
            setLocalAudioTrack(tracks[0]);
            setLocalVideoTrack(tracks[1]);
            mediaStore.current[0] = {
                audioTrack: tracks[0],
                videoTrack: tracks[1]
            };
            setReady(true);
        } else if (error) {
            setReady(false);
        }

        return function () {
            if (tracks) {
                var _tracks$, _tracks$2;

                (_tracks$ = tracks[0]) === null || _tracks$ === void 0 ? void 0 : _tracks$.close();
                (_tracks$2 = tracks[1]) === null || _tracks$2 === void 0 ? void 0 : _tracks$2.close();
            }
        };
    }, [trackReady, error]);

    return React.createElement(TracksContext.Provider, {
        value: {
            localVideoTrack: localVideoTrack,
            localAudioTrack: localAudioTrack
        }
    }, ready ? props.children : null);
};

export default AgoraTracksConfigure;
I extended the default TracksConfigure component to create tracks from whatever device ID passed in initial props. (The default TracksConfigure component does not allow any prop to be passed to select the required video input device.)
Try to extend any component to modify its behaviours.
Limitations
Agora React UIKit is a work under development. We cannot expect all the features of the agora-web-sdk-ng to be there. There are some missing features from the Agora Web SDK as I have noted. Hopefully they are in the development and will soon land in the agora-react-uikit.
- Screen sharing features are not implemented yet.
- Changing devices dynamically are not supported.
- Changing video call layouts are limited to two types of layouts.
- Even the extensions that we can do are limited because of the code patterns.
If you are looking forward to quickly integrate any video conferencing feature into your application, then agora-react-uikit is the library to go. If you really need some rich features into your video conferencing solution, then it is better to do some research to check whether all of your requirements are covered within the library. Or if it is possible to accommodate the requirements with changes to the library.
Hopefully we will see more updates to the library soon and the community will grow this to be an equivalent to the Agora Web SDK.