
We All Make Mistakes!
Development is not an easy job. It requires a lot of concentration. When it comes to writing a new piece of code, we are all beginners. Only change is that some of us have prior experience of writing code successfully so that those have some confidence in writing the code.
There are a lot of common developer errors. We cannot expect everyone to write perfect code. The idea is to reduce the coding errors gradually by making it a habit to avoid mistakes. Also you can be very familiar with coding patterns after some time such that even without running the code, you'll see the issues in the code.
- Code quality issues are harder to locate. These usually do not introduce functional issues.
- Code quality issues are harder to deal with. Sometimes entire application architectures might get changed.
- Huge performance issues can be introduced due to bad code. (Memory leaks, resource utilisation issues, etc.)
Hence it is better to start using an analysis tool than to later spend more time fixing complicated issues.

Telzee.io development team started looking into code analysis tools and experimented with SonarQube before making it a permanent tool in our development process.
SonarQube Integration
What is SonarQube
SonarQube is an open source tool for static code analysis which has become very popular recently. It is very easy to keep the code clean, simple and precise with SonarQube using the set of tools that it provides.


Static code analysis is the method of analysing code without executing it. Static code analysis tools do not need the application code to be run. Hence they will not point out runtime issues within the code.
SonarQube can be integrated into any deployment process in multiple ways.
- You can integrate into your deployment pipelines to run the analysis in your new code. (SonarQube Community Edition)
- You can use the IDE extension to get feedback about the code issues instantly. (SonarLint IDE plugin)
Setting up SonarQube
This is how to set up your SonarQube service on an AWS Ec2 instance. We use SonarQube on a common instance across the development team at Telzee.io so every team member can see the code quality details.
1. First start an EC2 instance on AWS. (In this case we will proceed with a t2.medium instance with Ubuntu 20 running in it.)
2. Update the Ubuntu packages.
sudo apt-get update
sudo apt-get -y upgrade
3. Install PostgreSQL in the instance and start the service. This PostgreSQL service will be used by the SonarQube service to record internal data.
Update the Ubuntu repositories.
sudo sh -c 'echo "deb http://apt.postgresql.org/pub/repos/apt/ `lsb_release -cs`-pgdg main" >> /etc/apt/sources.list.d/pgdg.list'
wget -q https://www.postgresql.org/media/keys/ACCC4CF8.asc -O - | sudo apt-key add -
Update PostgreSQL services.
sudo apt-get -y install postgresql postgresql-contrib4. We have to create a user and assign ownership of the previously created database to that user.
First change the password for the default PostgreSQL user and switch to that user.
sudo passwd postgres
su - postgres
We have to create a new user for SonarQube.
createuser sonarSwitch to the PostgreSQL console. We have to set a password to the newly created 'sonar' user and assign a database for that user to use.
psql
ALTER USER sonar WITH ENCRYPTED password 'passsword';
CREATE DATABASE sonar OWNER sonar;
Exit from the PostgreSQL shell
\qSwitch back to the default 'sudo' user by exiting the current 'sonar' user.
exit5. Download and configure the SonarQube as a service.
wget https://binaries.sonarsource.com/Distribution/sonarqube/sonarqube-9.5.tar.gz
sudo unzip sonarqube-9.5.zip -d /opt
sudo mv /opt/sonarqube-9.5 /opt/sonarqubeAssign administrator permissions to the SonarQube directory.
sudo chown -R administrator:administrator /opt/sonarqube/We have to edit the /opt/sonarqube/conf/sonar.properties file and change multiple lines to make this work.
Edit following lines to allow SonarQube to connect to the PostgreSQL service.
sonar.jdbc.username=sonar
sonar.jdbc.password=password
Uncomment the following line.
sonar.jdbc.url=jdbc:postgresql://localhost/sonarWe have to tell SonarQube to run in the server mode.
sonar.web.javaAdditionalOpts=-serverNow you can start the SonarQube service by running the /opt/sonarqube/bin/linux-x86-64/sonar.sh script. We'll set this script as a service in the next steps.
bash /opt/sonarqube/bin/linux-x86-64/sonar.sh6. We'll set SonarQube as a service now. SonarQube can be started directly using the startup script by editing the /etc/systemd/system/sonar.service file. We need to change its contents to the following.
[Unit]
Description=SonarQube service
After=syslog.target network.target

[Service]
Type=forking

ExecStart=/opt/sonarqube/bin/linux-x86-64/sonar.sh start
ExecStop=/opt/sonarqube/bin/linux-x86-64/sonar.sh stop

User=root
Group=root
Restart=always

[Install]
WantedBy=multi-user.target
Start the SonarQube with the changes.
sudo systemctl start sonarEnable SonarQube to be started at the system boot time.
sudo systemctl enable sonarYou will have access to this service in the local environment. We can make the service available to the incoming traffic of the instance. For this we'll make use of Nginx.
7. Install Nginx to route the incoming traffic to the SonarQube service.
 Erin Glass
Edit the Nginx configuration file, /etc/nginx/sites-enabled/sonarqube to configure traffic. (Assume that our SonarQube service runs on port 9000 and we need to open port 9090 for SonarQube.)
server{
    listen      9090;
    server_name sonarqube.developerinsider.co;

    access_log  /var/log/nginx/sonar.access.log;
    error_log   /var/log/nginx/sonar.error.log;

    proxy_buffers 16 64k;
    proxy_buffer_size 128k;

    location / {
        proxy_pass  http://127.0.0.1:9000;
        proxy_next_upstream error timeout invalid_header http_500 http_502 http_503 http_504;
        proxy_redirect off;

        proxy_set_header    Host            $host;
        proxy_set_header    X-Real-IP       $remote_addr;
        proxy_set_header    X-Forwarded-For $proxy_add_x_forwarded_for;
        proxy_set_header    X-Forwarded-Proto http;
    }
}
Nginx service restart will apply the changes.
sudo service nginx restartYou will be able to use SonarQube on http://domain:9090 now.
Gitlab Integration
We can let our Gitlab project know if we want to use SonarQube code analysis. We need to define a new pipeline in our project's gitlab-ci.yml.
sonarqube-check:
  stage: analyze
  image:
    name: sonarsource/sonar-scanner-cli:latest
    entrypoint: [""]
  variables:
    SONAR_USER_HOME: "${CI_PROJECT_DIR}/.sonar"  # Defines the location of the analysis task cache
    GIT_DEPTH: "0"  # Tells git to fetch all the branches of the project, required by the analysis task
  cache:
    key: "${CI_JOB_NAME}"
    paths:
      - .sonar/cache
  script:
    - sonar-scanner
  allow_failure: true
  only:
    - dev_branch
Above configuration will run SonarQube scan every time new changes are pushed to the dev_branch of the project. We can also configure this pipeline to run only when tags are created, periodically, etc.
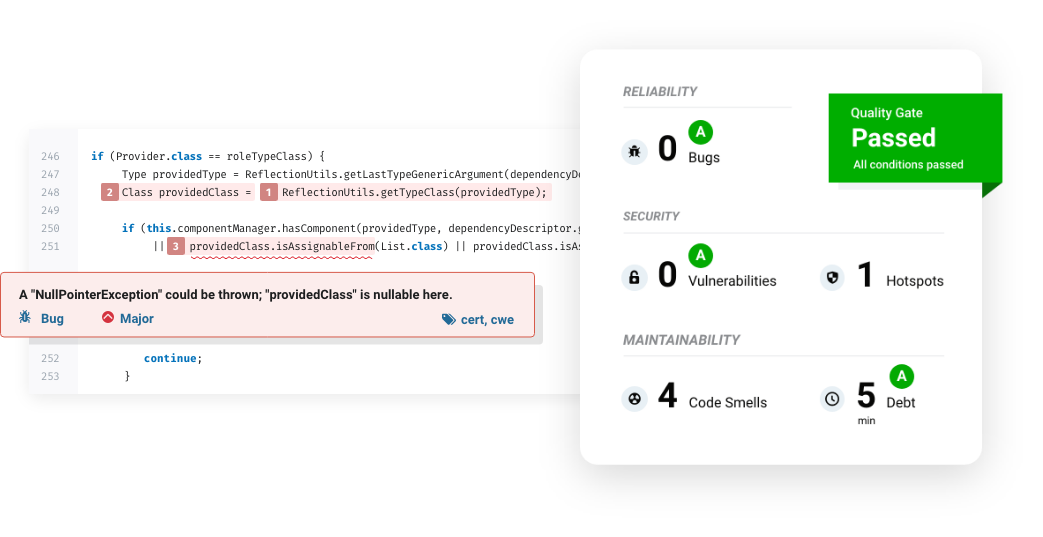
Go into the SonarQube dashboard and see what failed. It will indicate to you multiple things.
- File name and the location of the issue.
- Type, description and severity of the issue.
- Estimated time to fix the issue.
- Add a comment and assign it to any user.
- Code quality as a percentage.
Results and Benefits
As the development team of Telzee.io started using this we were able to mitigate most of the common code smells and avoid them. There are multiple benefits of a code quality analysis tool for a company.
- Less code quality issues are introduced to the code.
- Coding standards can be highly maintained.
- This can help reduce the time spent on code quality in code reviews.
- SonarQube introduces code quality packages for many languages. Users will get language specific code quality analysis results.
- Gitlab integration automatically runs the code analysis and provides results.
Maintaining code quality is a crucial segment of software development. Adding a code quality analysis tool into the development process is a proven way of efficiently analysing the code quality in a project. Being open source and simple to use, SonarQube is the one of the best solutions that a team can utilise.